Funny Coincidence – VS Build Tools existed on my PC without me knowing it

MS software is so ubiquitous on Windows that even when you don’t remember installing their stuff, one day you wake up and find out that you already did. I accidentally double right clicked on a std::cout and ended up activating a VSCode feature that takes you to the definition of the symbol you just selected. (I had no idea you could do that btw, that’s pretty neat)

I saw this:

???
???

At first I thought this was some VSCode C++ extension related thing but then I looked at the paths of the headers files on the right and I realized something was wrong.

Poorly made meme in MSPaint

I was surprised, and spent some a while trying to figure out how this could happen on a fresh install. It turns out, it got installed at the same date as Nodejs. I am not sure if Node still uses VS build tools for node-gyp. There’s a big chance that I might have installed this myself outside of the Nodejs installer, by issuing an npm i -g windows-build-tools command.

In any case, now that I actually had an MSVC compiler I thought why not have some fun with it.

cl.exe
cl.exe

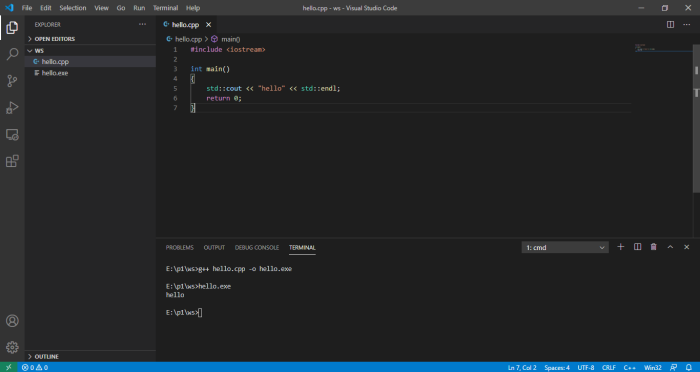
I tried compiling a Hello World program with it directly but it failed because it lacked an include path for iostream.

Apparently you have to go to “Microsoft Visual Studio\2017\BuildTools\Common7\Tools” and activate vsdevcmd.bat for it to work.

Interestingly, Win32 programs that compile straightforward with g++ don’t do the same with cl.exe.

I found out that you actually need to tell the compiler to link the correct static library .lib file to your program with a #pragma comment declaration below your header include statement.

#include <windows.h>
#pragma comment(lib,"user32.lib")
#include <shlobj.h>
#pragma comment(lib,"shell32.lib")

I’m eager to experiment with cl.exe and msbuild but I’ll stick with MinGW for now.

Making a simple C++/Win32 GUI application with MinGW – Part 2: Learning the basics

Making some simple programs is a good way of getting used to the Win32 API. Here’s the code for a basic application that shows a simple message box.

#include <windows.h>

int WINAPI WinMain(HINSTANCE hInstance, HINSTANCE hPrevInstance,

                   LPSTR lpCmdLine, int nCmdShow)

{

    LPCWSTR myText = L"Text for the message box";

    LPCWSTR myCaption = L"Caption for the message box";

    MessageBoxW(NULL, myText, myCaption, MB_OKCANCEL);

    return 0;

}
Basic Win32 program for creating a message box

I’ll compile it with mingw-w64’s g++ that we setup in my previous post.

Compiling and running the message box program
ws.exe in Explorer
ws.exe in Explorer

All of this might be confusing for people new to the Windows API, so let’s break it down line by line.

 #include <windows.h>

This line tells the g++ compiler to include the “windows.h” header file. Windows.h contains Windows API functions, macros and data types that must be used inside a Win32 application.


int WINAPI WinMain

This is the entry point for a graphical Windows application. In simple terms, it’s the equivalent of the standard C++ int main() but specific to Windows GUI applications.

(HINSTANCE hInstance, HINSTANCE hPrevInstance, LPSTR lpCmdLine, int nCmdShow)

lpCmdLine contains the command line arguments as a long pointer. nCmdShow decides if the application window will be maximized, minimized or act normally on launch. hPrevInstance is not used these days, its value is NULL or 0. hInstance is a HANDLE to an instance, used to identify the executable when it is loaded into memory. (More info here)

LPCWSTR myText = L"Text for the message box";
LPCWSTR myCaption = L"Caption for the message box";

LPCWSTR is a typedef/alias for const wchar_t * data type. The L prefix before the double quote is used to define a wide character string literal as opposed to a normal string. For more information on Windows data types, look here.

MessageBoxW(NULL, myText, myCaption, MB_OKCANCEL);

MessageBoxW is a Win32 API function used to create a modal dialog box.

int MessageBoxW(
HWND hWnd,
LPCWSTR lpText,
LPCWSTR lpCaption,
UINT uType
);

hWnd is a handle to the owner window of the dialog. Since we don’t have a parent window for our message box, we’ll leave it as NULL.

uType decides the contents and behavior of the dialog box. It can be defined with flags explained here.

Here’s a picture of message boxes with different uType values.

Message Boxes with different uTypes
Message Boxes with different uType values

We can create a composite message box by combining uType flags using the bitwise OR (|) operator. For example,

MessageBoxW(NULL, myText, myCaption, MB_HELP | MB_OKCANCEL);
Message Box with multiple flags

Making a simple C++/Win32 GUI application with MinGW – Part 1: Setting up the environment

I’ve always been fascinated by classic Win32 applications. They start up really quick, are always really fast and they rarely hog resources. The speed and fast startup is a huge plus for me, especially compared to “modern” desktop applications built with .NET.

I’m going to try and make a simple Win32 app, a program which helps me store the Spotlight lock-screen images that are changed periodically.

Spotlight Lockscreen (Source: Superuser.com)

The Compiler

The first step is getting the tools we need. I don’t feel like installing the massive Visual Studio IDE for this project so I’ll go with mingw-w64 which is a free port of the GNU C/C++ Compiler and other libraries/tools for 64 bit Windows. To install this, I’ll use a package distribution program called WinBuilds.

WinBuilds
WinBuilds

All packages from WinBuilds total are around 500MB in size (unextracted), compared to the multiple gigabytes for Visual Studio.

winbuilds dir
winbuilds directory

The WinBuilds directory will contain a “bin” subdirectory, containing EXE files for all the tools. Ideally one should add this directory to the PATH environment variable, but I’m going to be using a batch script to manually set for a terminal session.

add-mingw-to-path.bat

set PATH=%PATH%;c:\winbuilds\bin\

where C:\winbuilds\bin is your WinBuilds install directory.

add MinGW to path
add MinGW to path

I’ll be using VSCode as my text editor for this series. First I’ll make a simple C++ program that prints “Hello” and compile it with g++. Then I run the output EXE file. Seems to work so far.

Compiling and running my Hello.cpp file

Mingw-w64’s g++ produces Windows PE (portable executable) .EXE files, which is neat. I’ve not used any Windows APIs here, so hello.exe is not really a proper Win32 application yet.

To use the Windows API, we need to include windows.h and use Windows API functions. To test my setup I’ll use the first program from theForger’s Win32 API Programming Tutorial, the most famous Win32 API programming tutorial.

Hello.exe GUI window appears

It works. I’ll add more stuff to it in the next part.

How To Fix: Elan Touchpad Not Working While Keys Are Pressed/Held [Windows 10]

While using a laptop touchpad, I tend to use AutoHotKey to bind my mouse buttons to the keyboard. After a Windows update, the touchpad would stop responding after I pressed and held any key on the keyboard. This became a big problem for me so I was forced to find a solution and I think it is very important for this information to be available for everyone to see.

Step 1: Go to Control Panel and search Touchpad. Select the option that comes at the top.

Search "touchpad" in Control Panel
Search “touchpad” in Control Panel

Step 2: Open the “Additional” tab.

Click the "Additional" Tab
Click the “Additional” Tab

Step 3: Scroll all the way down to “TP Rejection” and click on it. Uncheck the checkbox that says “Enable”. Your touchpad should start responding after you press any keys.

Uncheck the "Enable" box
Uncheck the “Enable” box